Making marijuana cuttings is a relatively easy process, following certain steps.
Cannabis is plant which can be reproduced sexually – seed – or asexually – clones or cuttings.
Cuttings are plant clones; usually, they are used to preserve a species that, due to its characteristics, like phenotype or production, cannot be lost. The choice of the plant you get the cuttings from is up to the grower, looking for the desired traits, according to his preferences.

Besides, many growers prefer to start from cuttings, since crop time gets reduced. Summing up, and easily explained, a cutting is a piece of a branch of a mother plant, stimulated to be rooted and forming a new plant; the cutting, or clone, will preserve 99% traits similar to mother plant.
In fact, the word schidia appeared in the work of classic writers like Vitrubius or Pliny the Elder; besides, the Latin word is, in turn, a loanword from Greek σχίδια, plural neutral of σχίδιον – schidia or schiza, that is, fragment of unattached wood, chip, bifurcated branch of a plant or way. The Greek word comes from the Greek verb σχίζω – schizo, that is, split or rip.
- 1 For cuttings, you need some basic equipment:
- 2 Before making the cuttings, take into account a few tips:
- 3 Cutting step by step:
- 3.1 1. Choose the mother plant you are getting the cuttings from.
- 3.2 2. Prepare the substrate; you can choose different options, according to your preferences:
- 3.3 3. With the help of a paintbrush, we spread the cut with the rooting hormones.
- 3.4 4. Put the cutting into the chosen soil, and press the soil slightly to be in touch with the clone.
- 3.5 5. Spray the cuttings with water and put them in the greenhouse with the lid close.
- 3.6 6. Leave the greenhouse closed and spray the leaves everyday to keep humidity.
- 3.7 7. In 4-5 days, open the greenhouse hatches, so humidity keeps descending progressively and fresh air keeps entering.
- 3.8 8. Check the soil is not dry; if it is, pour a little water onto the tray bottom for 10 minutes, so it gets moisturized again.
- 3.9 9. In two weeks, we can uncover the greenhouse.
- 3.10 10. In 14-15 days, the cuttings should be rooted.
- 3.11 11. When the roots surge out of the soil, transplant them into the permanent ground.
- 4 Tips to make cuttings
- 5 How to make home-made rooting hormones?
- 6 When can I make the cuttings?
- 7 When can I transplant them?
- 8 Advantages and disadvantages of crops with cuttings
For cuttings, you need some basic equipment:
- –Healthy mother plant to take cuttings.
- -Cutter, scalpel or very sharpened scissors for a clean cut.
- –Rooting hormones.
- –Paintbrush to apply the hormones.
- –Glass of water.
- –Substrate for cuttings.
- –Suitable light for cuttings – usually, low-consumption fluorescent.
- –Greenhouse or propagator.
Before making the cuttings, take into account a few tips:
- –The work area has to be clean and sanitized, as well as all the tools you are going to use.
- –The mother plant has to be irrigated on the previous day, so it would be properly moisturized when making the cuttings; do not use too young mother plants – less than two months.
The cuttings have to be at 18-22 degree temperature, with 90% humidity, so it is recommended to use the greenhouses or propagators with a heater, or complement them with a thermal blanket to control the temperature – if it is too low, the cuttings will die; greenhouses ensure proper parameters for cutting growing.
Cutting step by step:
Following up, we synthesize how to make cuttings step by step, that is, the point is providing a fast and simple tutorial or manual, describing the whole process as clearly as possible. Later, on cutting recommendations, we will solve possible doubts on these steps.
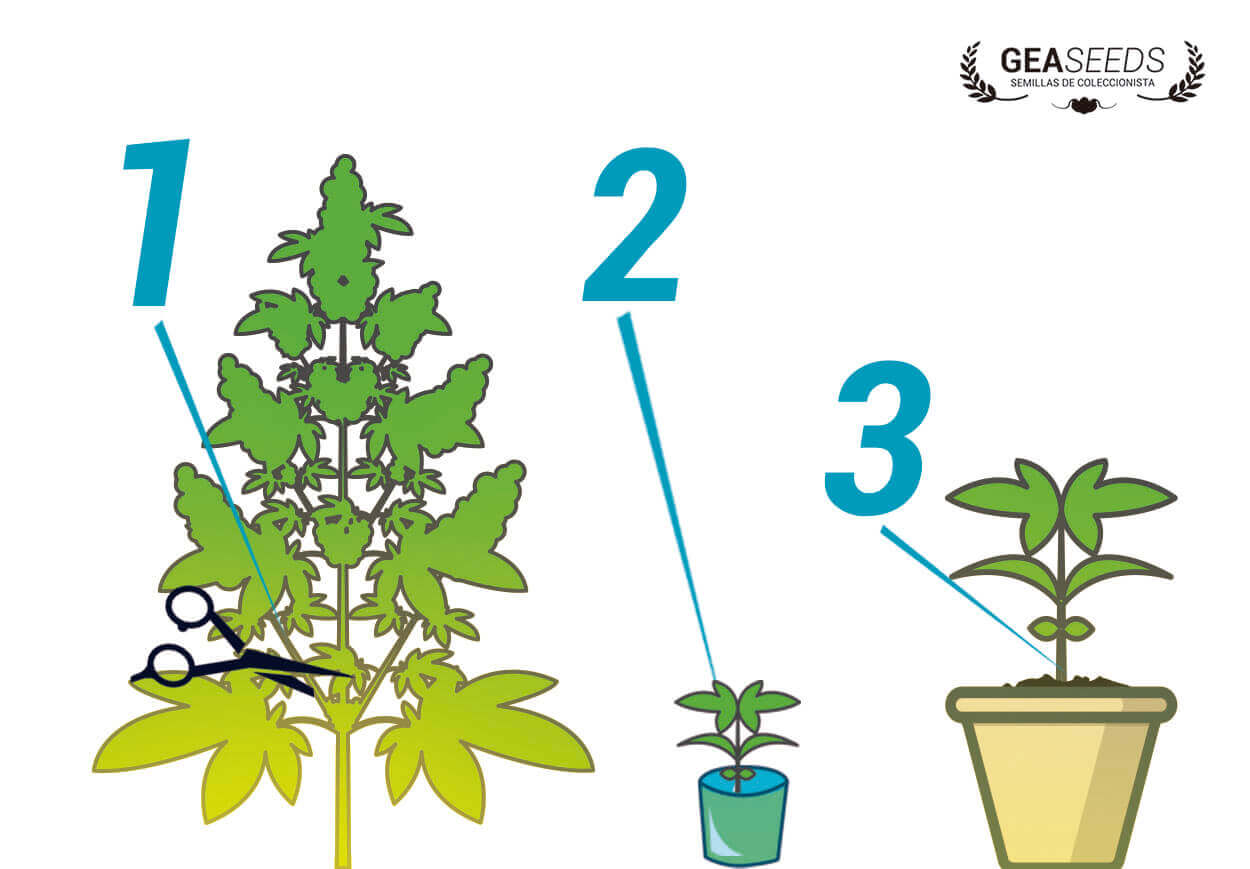
1. Choose the mother plant you are getting the cuttings from.
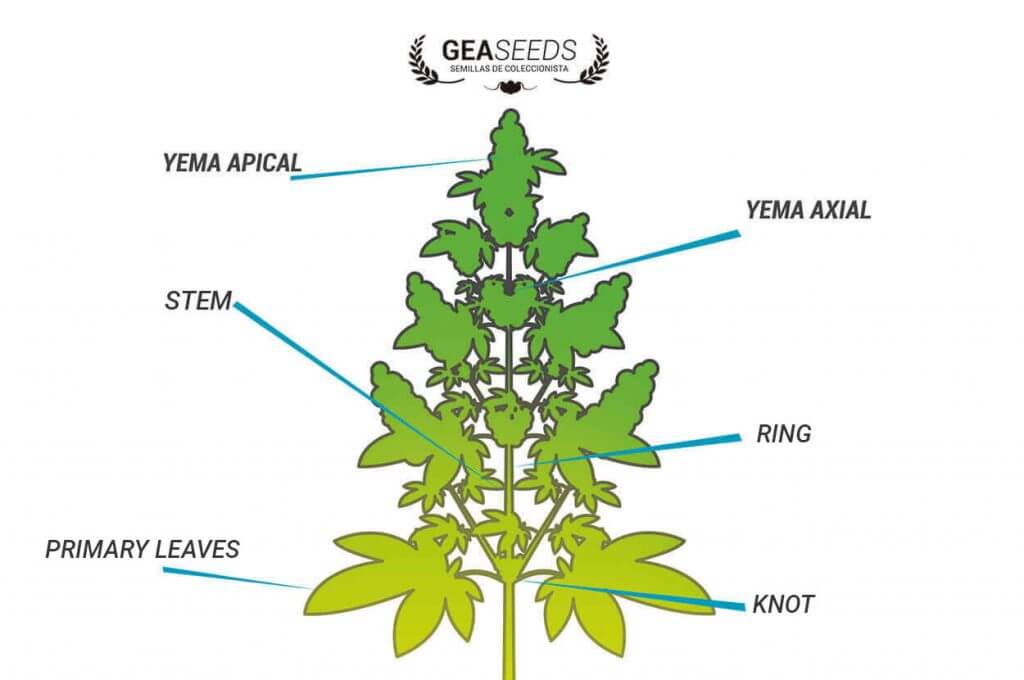
With the cutter or scalpel, cut one of the branches in a 45º angle; the branch has to be firm, with at least three or four knots, and the cut has to be made between two knots. Remove the leaves of all the knots, except for the upper part, and put the cutting into the glass of water, and, then, cut the tip of the leaves. Repeat it at will.
2. Prepare the substrate; you can choose different options, according to your preferences:
- -Jiffies: soak them in water for ten minutes, and, then, drain them to remove the excess water.
- –Rock wool: being an inert substrate, it has to be soaked with a 4.5 PH.
- -Soil: put the soil for the cuttings in alveoli or pots.
Once the soil is ready, make holes in the soil with the tip of a paintbrush or the back of a pencil; they have to be slightly wider than the stem, so, next, the cuttings can be introduced without losing the rooting hormones.
3. With the help of a paintbrush, we spread the cut with the rooting hormones.
Many growers scrape the surface where the hormones are applied or make a cut and divide it into two halves, so the cutting produces more roots.
You can also pour the liquid into a lid, and keep introducing the cuttings, instead of using the paintbrush, but do not introduce the cutting directly into the pot.
4. Put the cutting into the chosen soil, and press the soil slightly to be in touch with the clone.
At least, introduce one knot under the soil, and two knots above.
5. Spray the cuttings with water and put them in the greenhouse with the lid close.
Leave them under the fluorescent light, with 18/6 photoperiod; during the first days, the minimum humidity is 90%, to be reduced progressively.
6. Leave the greenhouse closed and spray the leaves everyday to keep humidity.
7. In 4-5 days, open the greenhouse hatches, so humidity keeps descending progressively and fresh air keeps entering.
8. Check the soil is not dry; if it is, pour a little water onto the tray bottom for 10 minutes, so it gets moisturized again.
9. In two weeks, we can uncover the greenhouse.
Check the cuttings behavior; if going down, spray the leaves, cover the greenhouse again and repeat the process on the following day till they get upright.
10. In 14-15 days, the cuttings should be rooted.
Some strains could root in a week, some strains in three weeks; if not rooted after 25 days, they would not be rooted anymore, so they would be discarded.
11. When the roots surge out of the soil, transplant them into the permanent ground.
Notice that some strains are easier to clone; choose a healthy mother plant, for vigorous cuttings.
Although apparently complex, it is easy to make; just be meticulous and hygienic: following these steps, you will undoubtedly get cuttings from your favorite plant.
Tips to make cuttings
When you cut the pieces of mother plant, you can use the apical sprouts to cut some leave tips, in order to avoid dehydration.
Do not forget to put labels with the names of each strain, when choosing more than one mother plant for the cuttings.
When using Jiffis, they can be soaked in warm water for about 10 minutes. When using rock wool, it can be soaked in 4.5 pH water, with some rooting product, for 24 hours.
For proper plant rooting, the cutting cut can be soaked by rooting hormones.
When planted indoors, they will have to be vaporized every day, with 18/6 photoperiod.
After the first week, if the soil gets dried, we will maintain it under some water centimeters for about 20 minutes.
After the first fortnight, we can remove the mini-greenhouse lid; if they are folded or limp, they should come back to the mini-greenhouse for a few days.
If they have not been rooted after 25 days, they will not probably root anymore. Try it again, and try to find out your mistake.
When rooted, you only have to transplant them into the final soil, and administer rooting-marijuana compost. Moreover, you could create your own home-made rooting hormones.
How to make home-made rooting hormones?
As mentioned above, rooting hormones are used for productive and increased roots by means of the cuttings, although they can be useful to stimulate the development of the root system of the plants.
Now we introduce three different formulas to produce our own rooting hormones:
- Lentils: put a cup of lentils with four cups of water for a few days; when they germinate, the solution will be ready.
- Weeping willow:place cuttings or pieces of branches with bark and water in a bowl, letting it rest for 3 weeks.
- Wheat or maize:mix a cup of wheat or maize, with one cup of water. After a week, the solution will be ready.
When can I make the cuttings?
Generally, the best periods to make cuttings are spring and summer. About marijuana, you can make the cuttings as soon as possible, for them to properly root, grow and flourish before crop period; basically, in northern hemisphere it is recommended to make them between May and June, while, in southern hemisphere, it is recommended between November and January. When making indoor cuttings, the time of the year is not relevant, because we reproduce the photoperiod. And our mother plant will have to be growing constantly, because we cannot make cuttings from a flourished plant.
When can I transplant them?
When having the cuttings made, we must know the moment to plant them in the final soil. As previously mentioned, if it is in northern hemisphere, they are made between May and July; if in southern hemisphere, between November and January. In fact, the best months are July and January, because the cutting needs time to get properly rooted, grown and big enough for flourishing.
But, if made beforehand, due to scarce light hours, they will probably start to flourish and, with increased light hours, they will replant, so we have to transplant them into the final soil when they are properly rooted and they have some growing months ahead.
Advantages and disadvantages of crops with cuttings
Asexual cutting reproduction allows us to produce plants ready to bud straight and direct, if we compare it to average seeds. Moreover, one of the best advantages is focused on knowing the future plant characteristics beforehand, differently from seeds.
With the cuttings, we confirm that the clone characteristics will be similar to mother plant ones, so it is the only way for us to assure proper genetics in our crop, preserving and consuming our favorite genetics. Besides, you can always make cuttings from your favorite variety, and preserve them in a low-budget indoor facility. This way, you will be able to plant the same genetics in the following season, assuring your crop quality..